
Are you tired of seeing the same profile picture and cover photo on your Resso app? Would you like to give it a fresh new look that truly reflects your personality? Look no further!In this article, we will provide you with a detailed guide on how to change your profile picture and cover photo within the Resso app. It’s time to get creative and make a statement with your music streaming profile! You can also check detailed comparison between Spotify and Resso.
Changing Your Profile Picture
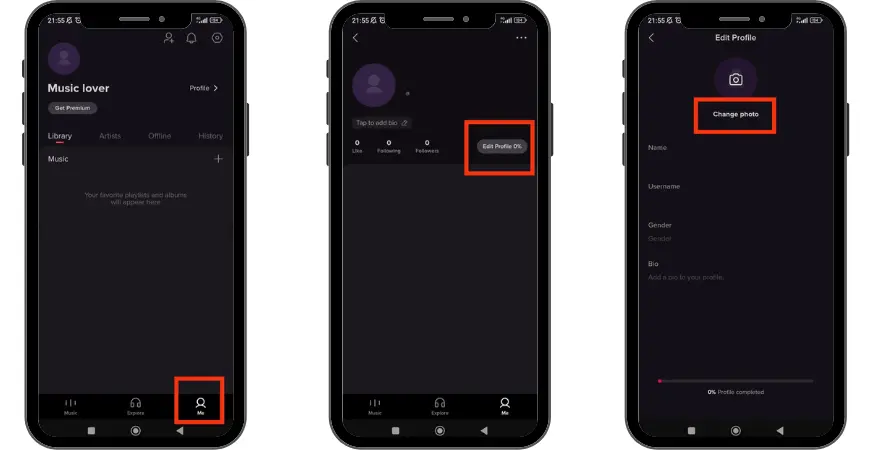
Step 1: Navigate the Resso app
Navigate the Resso app on your home screen, once you have found it, click on that.
Step 2: Go to Resso Profile Page
Once you’ve opened the Resso app, click on the “Me” tab. It is at the bottom of the screen.
Step 3: Click on Your Profile Picture
On your profile page, locate your current profile picture and click on it. This will open the profile picture editor.
Step 4: Choose a New Profile Picture
To select a new profile picture, you have two options: select a photo from your device’s existing library or capture a fresh photo using your device’s built-in camera.
Step 5: Edit Your Profile Picture
After selecting your new profile picture, you can edit it by adjusting the size and position of the photo. To do this, use the pinch and drag features to resize and move the photo until you are satisfied with the final result.
Step 6: Save Your New Profile Picture
Once you are satisfied with your new profile picture, click on the “Save” button located at the top of the screen. After successfully changing your profile picture, the updated image will now be visible on your Resso profile page.
Changing Your Cover Photo
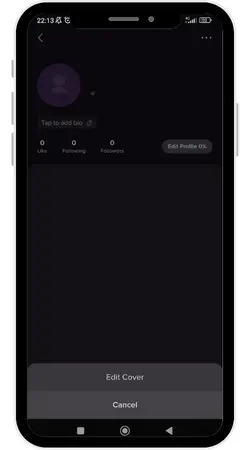
Step 1: Navigate the Resso app
Navigate the Resso app on your home screen, once you have found it, click on that. Step 2: Access Your Profile
Step 2: Go to Resso Profile Page
Once you’ve opened the Resso app, tab on the “Profile” option. You can locate it at the bottom of the screen. Upon doing this, you will be redirected to your Resso profile page.
Step 3: Click on Your Cover Photo
On your profile page, locate your current cover photo and click on it. This will open the cover photo editor.
Step 4: Choose a New Cover Photo
To select a new cover photo, you have two options:select a photo from your device’s existing library or capture a fresh photo using your device’s built-in camera.
Step 5: Edit Your Cover Photo
After selecting your new cover photo, you can edit it by adjusting the size and position of the photo. To do this, use the pinch and drag options to resize and move the photo.
Step 6: Save Your New Cover Photo
Once you are satisfied with your new cover photo, click on the “Save” button located at the top of the screen to save all the changes.
Conclusion
Updating your Resso app profile picture and cover photo can give your profile a new and unique look that represents you. This guide has outlined simple steps that will help you change your profile picture and cover photo quickly and easily. By following these steps, you can choose photos that truly reflect your personality and showcase your uniqueness. With just a few taps, you can have a fresh profile and cover photo that will impress your followers and enhance your Resso experience.

3 thoughts on “How To Change Resso Profile And Cover Picture?”